ConsoleUI programming guide
This document contains a brief introduction using ConsoleUI.
Introduction
ConsoleUI is a library for prompting the user for different types of input. It provides simple UI elements on ANSI console-based terminals. ConsoleUI is inspired by Inquirer.js which is written in JavaScript.
Features
Console UI currently supports:
- Text input with completion and GNU ReadLine compatible editing
- Checkboxes
- Lists
- Expandable Choices (multiple key-based answers for a question with help and optional list navigation)
- Yes/No-Questions
A small example
The following code presents a simple, but complete code example to use CosoleUI for selecting an item from a list.
package de.codeshelf.consoleui;

import de.codeshelf.consoleui.prompt.ConsolePrompt;
import de.codeshelf.consoleui.prompt.PromtResultItemIF;
import de.codeshelf.consoleui.prompt.builder.PromptBuilder;
import jline.TerminalFactory;
import org.fusesource.jansi.AnsiConsole;

import java.io.IOException;
import java.util.HashMap;

import static org.fusesource.jansi.Ansi.ansi;

/**
 * User: Andreas Wegmann
 * Date: 12.08.2020
 */
public class SimpleExample {

  public static void main(String[] args) throws InterruptedException {
    AnsiConsole.systemInstall();                                      // #1
    System.out.println(ansi().eraseScreen().render("Simple list example:"));

    try {
      ConsolePrompt prompt = new ConsolePrompt();                     // #2
      PromptBuilder promptBuilder = prompt.getPromptBuilder();        // #3

      promptBuilder.createListPrompt()                                // #4
              .name("pizzatype")
              .message("Which pizza do you want?")
              .newItem().text("Margherita").add()  // without name (name defaults to text)
              .newItem("veneziana").text("Veneziana").add()
              .newItem("hawai").text("Hawai").add()
              .newItem("quattro").text("Quattro Stagioni").add()
              .addPrompt();

      HashMap<String, ? extends PromtResultItemIF> result = prompt.prompt(promptBuilder.build()); // #5
      System.out.println("result = " + result);
    } catch (IOException e) {
      e.printStackTrace();
    } finally {
      try {
        TerminalFactory.get().restore();
      } catch (Exception e) {
        e.printStackTrace();
      }
    }
  }}
Basic steps:
- ConsoleUI uses jansi, so you have to initialize it first
- Create a new
ConsolePromptobject. - Create a
PromptBuilder. All user interactions can be created with the prompt builder object. - In this example, we create a
ListPrompt- give it a name (‘pizzatype’)
- assign a prompt message (“Which pizza do you want?”)
- create items with and name (optional) and a text and add them to the ListPrompt
- to finish call
addPrompt()to create the ListPrompt and add it to the prompt builder object.
- calling
prompt.prompt(promptBuilder.build())builds all the prompts (in this example only one) and enters the user interaction. After all prompts are processes, theprompt()method returns an object with the user input results.
Prompting for user input
Input
The InputPrompt is a classic entry line like a shell. Because of the underlying readline implementation, it offers you to provide completers (like file name completer or string completer). In addition to his, you can define a mask character that is printed on the screen instead of the typed keys like used for hidden password entry.
promptBuilder.createInputPrompt()                               // #1
  .name("name")                                                 // #2
  .message("Please enter your name")                            // #3
  .defaultValue("John Doe")                                     // #4
  //.mask('*')                                                  // #5
  .addCompleter(new StringsCompleter("Jim", "Jack", "John"))    // #6
  .addPrompt();
Description:
- With the prompt builder call
createInputPrompt()to create a new input prompt builder - Set a name for the prompt. Setting a name is necessary to pick the right user input from the result object after the user interaction is finished. The resulting object is
HashMapwhere each key is the name of a prompt you have created before. - Add a message which is printed in front of the user input.
- (optional) By adding a default value, you offer the user just to press enter to accept the default value. The default value is printed in parentheses after the prompt.
- (optional) If you add a masking character, each key pressed by the user echoed as masked character on the console. That’s useful for password entries.
- (optional) You can add completers (like simple string completers, file completers or more complex completers) to simplify the user input. The user can use the TAB button to complete partial input. See jline/jline2 for details and examples.
Console

User Input
The user can use readline compatible navigation (mainly Emacs control codes) inside the user input area. This includes CTRL-a to go to the beginning of input, CTRL-e to go to the end, and so on.
After the input, the entered value is printed in different color right after the prompt.
Result
The result of this prompt is of type InputResult and has a method getInput() to get user input.
List
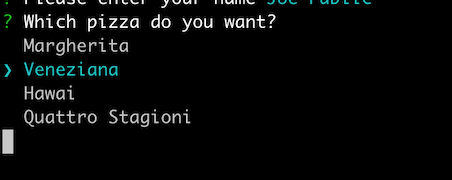
The ListPrompt lets the user choose one item from a given list. If the list is bigger than the terminal height, the list is partially shown and scrolled if needed.
promptBuilder.createListPrompt()                                                // #1
  .name("pizzatype")                                                            // #2
  .message("Which pizza do you want?")                                          // #3
  .newItem().text("Margherita").add()  // without name (name defaults to text)     #4
  .newItem("veneziana").text("Veneziana").add()                                 // #5
  .newItem("hawai").text("Hawai").add()
  .newItem("quattro").text("Quattro Stagioni").add()
  // .pageSize(10)                                                                 #6
  // .relativePageSize(66)																											   #7
  .addPrompt();
Description:
- With the prompt builder call
createListPrompt()to create a new list prompt builder. - Set a name for the prompt.
- Add a message which is printed on top of the list.
- Add items to the list. If you call
newItem()without a name for the item, the text of the item is used in the result. - Add items with
newItem(<item_name>)to give the item a name which makes it possible to use a technical key or another value instead of the printed text as a result. - (optional) For long lists, you can use
pageSize()to set an absolute number of items to display (default is 10). Even if you choose a higher value than the terminal, the list will never exceed the terminal height. - (optional) Further you can use
relativePageSize()to set a percentual size of the terminal as height. In this example, 66 is 66/100 or 2/3 of the terminal used for the list items. At least one line is displayed, even when you select a very low value.
Console
User input
The user can use up and down keys or VI like the keys 'j' for down and 'k' for moving the selector in front of the items to the right position. Pressing the enter button selects the item.
After the input, the list is erased from the screen and the selected value is printed in a different color right after the prompt.
Result
The result of this prompt is of type ListResult and has a method getSelectedId() to get user input.
Checkbox
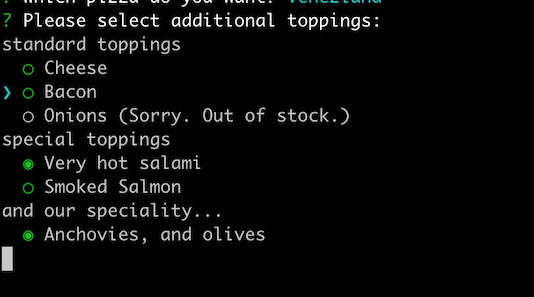
The checkbox input lets the user choose any number of items of a given list. It’s possible to add separators between items. Further, it’s possible to disable items and display a message text, why they are disabled. Sometimes this may be useful to present a consistent user interface with all usually displayed options and an explanation of why some items are not usable here.
promptBuilder.createCheckboxPrompt()                                            // #1
  .name("topping")                                                              // #2
  .message("Please select additional toppings:")                                // #3
  .newSeparator("standard toppings").add()                                      // #4
  .newItem().name("cheese").text("Cheese").add()                                // #5
  .newItem("bacon").text("Bacon").add()                                         // #6
  .newItem("onions").text("Onions").disabledText("Sorry. Out of stock.").add()  // #7
  .newSeparator().text("special toppings").add()
  .newItem("salami").text("Very hot salami").check().add()                      // #8
  .newItem("salmon").text("Smoked Salmon").add()
  .newSeparator("and our speciality...").add()
  .newItem("special").text("Anchovies, and olives").checked(true).add()         // #9
  // .pageSize(10)                                                                 #10
  // .relativePageSize(66)																											   #11
  .addPrompt();
Description:
- With the prompt builder call
createCheckboxPrompt()to create a new checkbox prompt builder. - Set a name for the prompt.
- Add a message which is printed on top of the list.
- Use
newSeparator()to add a separation element with a describing text. - Use
newItem()like in the list prompt to add selectable elements to the checkbox prompt. - The name can be set directly with
newItem(<name>)instead of using thename()method. - With
disabledText()the item is not selectable, the text is displayed after the item. Note: even when the item is disabled it can be checked by default. - Use the
check()method to pre-check the corresponding item. - For more flexibility, you can use
checked()with a boolean value to select if the item is checked by default. - (optional) For long lists, you can use
pageSize()to set an absolute number of items to display (default is 10). Even if you choose a higher value than the terminal, the list will never exceed the terminal height. - (optional) Further you can use
relativePageSize()to set a percentual size of the terminal as height. In this example, 66 is 66/100 or 2/3 of the terminal used for the list items. At least one line is displayed even when you select a very low value.
Console
User input
The user can use up and down keys or VI like the keys 'j' for down and 'k' for moving the selector in front of the items to the right position. Toggling selection on an item is done with the space bar. Pressing the enter button finished the input.
After the input, the list is erased from the screen and the names of the selected values are printed in a different color right after the prompt.
Result
The result of this prompt is of type CheckboxResult and has a method getSelectedIds() to get user input which is of typeHashSet<String> containing the names of the selected items.
Expandable choice
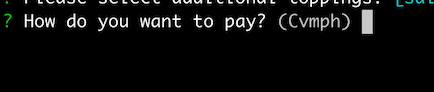
The choice prompt lets the user choose one from a given number of possible answers. It is used for requesting input that would be done in a graphical user interface by a message box. It’s usable for choices like “yes/no/cancel”. Each entry is assigned to a single keystroke to provide a quick input by pressing that key.
By default, only the message and the possible keys are displayed which may make it difficult for new users to know what keystroke is associated with what answer. To get around this, a help mode is integrated. If the user pressed the ‘h’ button (for help), all possible answers with explanations are shown as a list where the user can choose from.
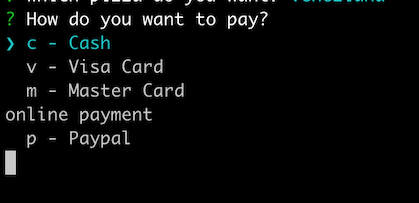
promptBuilder.createChoicePrompt()                                          // #1
  .name("payment")                                                          // #2
  .message("How do you want to pay?")                                       // #3
  .newItem().name("cash").message("Cash").key('c').asDefault().add()        // #4
  .newItem("visa").message("Visa Card").key('v').add()                      // #5
  .newItem("master").message("Master Card").key('m').add()
  .newSeparator("online payment").add()                                     // #6
  .newItem("paypal").message("Paypal").key('p').add()
  .addPrompt();
Description:
- With the prompt builder call
createChoicePrompt()to create a new choice prompt builder. - Set a name for the prompt.
- Add a message which is printed on the screen.
- Create new items with name, message, and an associated key. One of the items can be a default.
- Create other non-default items.
- Use
newSeparator()to add a separation element with a describing text.
Console and user input
By default, the message is displayed and a list of all short keys for selection. The default value key is printed in upper case to indicate the default value. The letter ‘h’ is added to the list by default to activate the more detailed helpful list view.
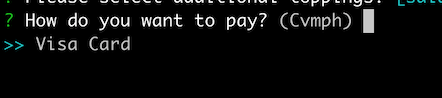
If the user presses one of the choice keys, the corresponding message is displayed and can be confirmed with the enter key.
If the user presses the ‘h’ key, the long list is displayed.
The detailed navigation is usable like the list prompt by pressing up and down arrow keys and selecting a value with the enter key.
Result
The result of this prompt is of type ExpandableChoiceResult and has a method getSelectedId() to get user input.
Confirmation
The confirmation prompt lets the user answer with ‘yes’ or ‘no’ to a given question. This is the minimalistic version of the choice prompt.
promptBuilder.createConfirmPromp()                       // #1
  .name("delivery")                                      // #2
  .message("Is this pizza for delivery?")                // #3
  .defaultValue(ConfirmChoice.ConfirmationValue.YES)     // #4
  .addPrompt();
Description:
- With the prompt builder call
createChonfirmPrompt()to create a new confirmation prompt builder. - Set a name for the prompt.
- Add a message which is printed as prompt.
- With
defaultValue()you can set either ‘yes’ or ‘no’ as a default.
Console

User input
By pressing ‘y’ or ‘n’ (or ‘j/n’ in the german localization) the user can select between ‘yes’ and ‘no’ as an answer. By pressing the enter key the user confirms the input.
Result
The result of this prompt is of type ConfirmResult and has a method getConfirmed() to get user input of type ConfirmChoice.ConfirmationValue which is an enum of either ‘YES’ or ‘NO’.